Create an access token
Prerequisites
In order to request a token, you need to have an app configured in your Beyond Identity tenant.
This can be an application you configure yourself, or you can request a token for the built in Beyond Identity Management API app.
Several app properties impact how tokens should be requested and validated. The examples below illustrate several variations of those properties.
Admin Console
The simplest way to acquire an access token is through the Beyond Identity Admin Console. The console enables you to create an access token for applications that use the client credentials grant type, such as the built in Beyond Identity Management API. For apps that use the authorization code grant type, you'll need to request the token programmatically.
Create an access token in the console
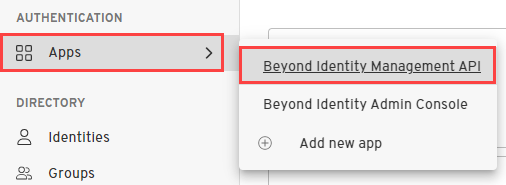
Under Apps, select the app for which you want a token, such as the Beyond Identity Management API application.
Select the API Tokens tab, and then click on Create token. (Note that the API Tokens tab only exists for apps that use the client credentials grant type. For apps that use the authorization code grant type, you'll need to request the token programmatically. )
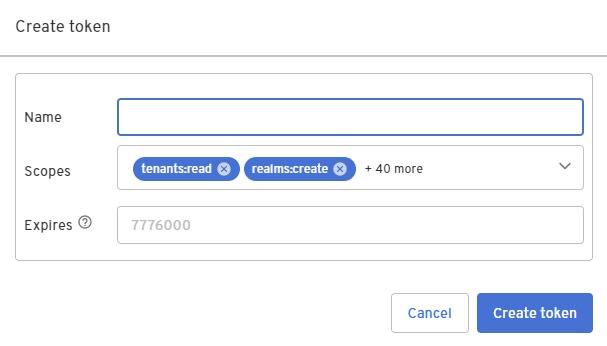
Configure the token with a Name, modify the list of Scopes based on your use case, and click Create token.
Note that the list of Scopes available to request comes from the Resource Server associated with the app.
API
Using API requests, you can create tokens for apps that use either the client credentials or the authorization code grant type. To request tokens for an app programmatically, send a request to the app's /authorize and/or /token API endpoints. The requests follow the OAuth and OIDC protocols as described below.
Token Request Scenarios
There are three main scenarios for requesting an access token:
Using the OAuth client credentials grant type with a confidential client
Use this grant type for an app or script that accesses resources under its own identity with no user involved (machine to machine). The app must provide its own credentials for authentication to the authorization server.
Using the OIDC authorization code grant type with a public client (PKCE required)
The authorization code grant type is intended for scenarios in which a user must provide their credentials and authorize access. Based on the user's authentication and consent, the authorization server returns a code that the app can then exchange for access tokens. In addition, the OIDC protocol provides for an id_token that the client app itself can consume for information about the user.
A "public client" refers to an app that runs on the client side, such as a native mobile app or a javascript app that runs entirely in the browser, that cannot protect client credentials. PKCE is required for such apps.
Using the OIDC authorization code grant type with a confidential client (PKCE recommended)
This scenario is like the above, except that a "confidential client" is an app with a back end that can protect client credentials. PKCE is recommended but not required for such apps.
Authorization and Token request URLs
The URLs to send authorization and token requests for an app are based on the Beyond Identity tenant, realm, and application ID.
There are two main endpoints for requesting tokens:
The /authorize endpoint:
https://auth-{us|eu}.beyondidentity.com/v1/tenants/{tenant_id}/realms/{realm_id}/applications/{application_id}/authorize
and the /token endpoint:
https://auth-{us|eu}.beyondidentity.com/v1/tenants/{tenant_id}/realms/{realm_id}/applications/{application_id}/token
where:
{tenant_id} is the ID of the tenant in which the app is configured
{realm_id} is the Realm Id of the realm in which the application is configured
{application_id} is the Application ID of the app
Finding app endpoint URLs
For any Beyond Identity application, you can find the authorization and token request URLs in the Admin Console on the app's External Protocol tab.
App that uses the Client Credentials grant type
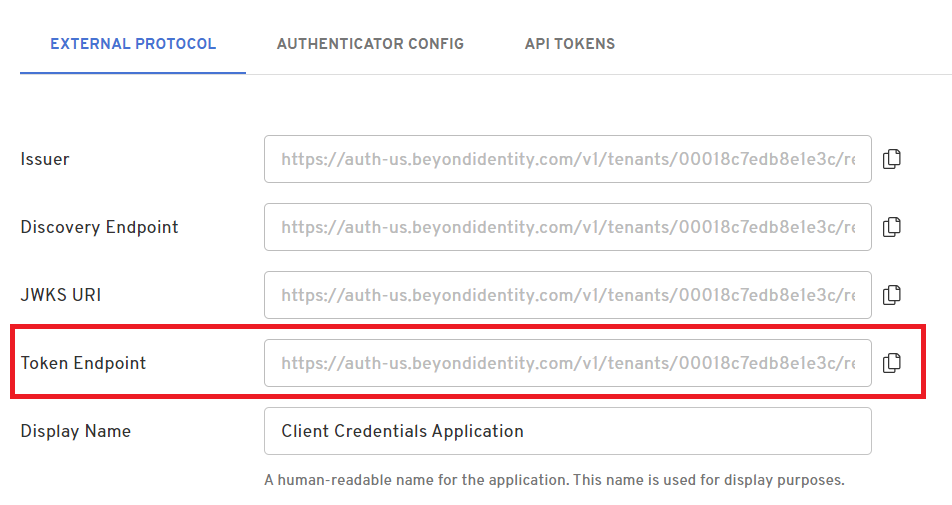
An app that uses the client credentials grant type will only have a /token endpoint as shown here:
App that uses the Authorization Code grant type
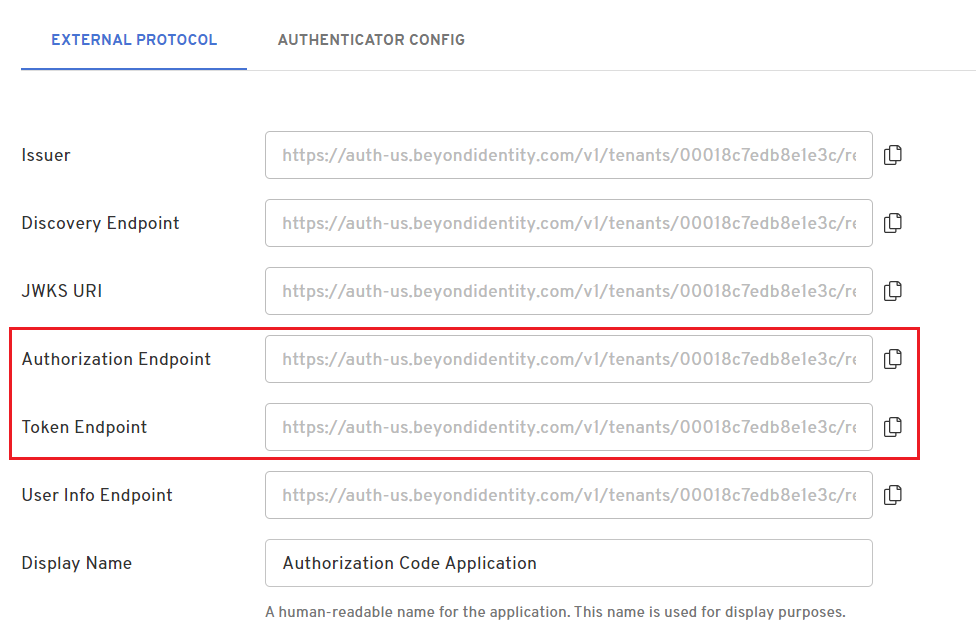
An app that uses the authorization code grant type will have both /authorize and /token endpoints as shown below:
Client credentials grant type (Confidential client)
In this simple flow, you will use the app's credentials to authenticate a single API call to the app's /token endpoint.
First, create the app:
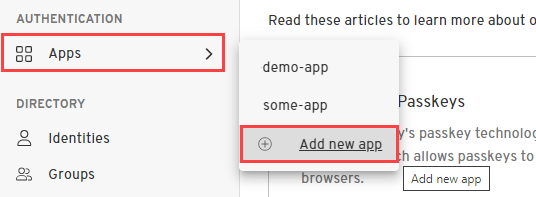
From the Admin Console, under Authentication, select Apps > Add new app.
Give your application a name.
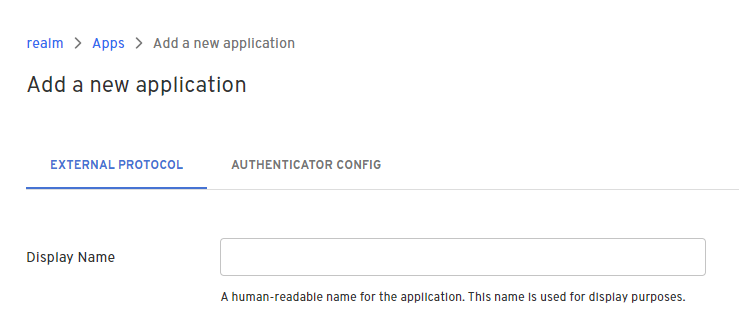
On the External Protocol tab, use the following values to complete this tab.
Property Value Display Name Descriptive name you choose Protocol OAuth2 Client Type Confidential PKCE Disabled Redirect URIs Use your application's App Scheme or Universal URL.
Your redirect URI follows the pattern:http://localhost:3000/api/auth/callback/beyondidentityToken Endpoint Auth Method Client Secret Basic Grant Type Client Credentials Click Submit to save the new app.
Next, create the HTTP request:
Request url:
https://auth-{us|eu}.beyondidentity.com/v1/tenants/{tenant_id}/realms/{realm_id}/applications/{application_id}/tokenYou can find the
/tokenurl in the Admin Console on the app's External Protocol tab as shown here:Request method: POST
Request headers:
Authorization: Basic {client_credentials}
content-type: application/x-www-form-urlencoded
where {client_credentials} is value of the app's Client ID and Client Secret, concatenated together in the format '{client_id}:{client_secret}' and base64 encoded
Request body:
grant_type: "client_credentials"
scope: {scopes}
expiration_time: {seconds}
custom_claims: {custom_claims_json}
where:
Property Value scope {scopes} is one or more of the app's Allowed Scopes, space delimited. expiration_time expiration_time is an OPTIONAL parameter, and {seconds} is the desired time after minting, in seconds, for which the token will be considered valid. If included, this value must be less than or equal to the app's configured Expires setting custom_claims custom_claims is an OPTIONAL parameter, and {custom_claims_json} is a JSON string containing the desired additional claims as key value pairs, for example '{"a": "b", "c": "d"}'. Upon successful token request, the resulting token will contain additional field 'bi_custom' with the desired claims.
Authorization code with PKCE (Public client)
In this flow, you call the app's /authorize endpoint, initiating a browser based flow where the user provides their credentials in exchange for a code. In a second API call to the /token endpoint, you then exchange the code for an access token.
Note that you will need an identity configured with the ability to authorize the scopes your app is requesting.
Create an app with the following properties:
Property Value Protocol OIDC Client Type Public PKCE S256 Token Endpoint Auth Method None Grant Type Authorization Code Configuration Type (on Authenticator Config tab) Hosted Web Fill in a Display Name and at least one Redirect URI, then click Submit to save the app.
Create your
/authorizerequestCreate the HTTP request with the following properties:
Request method: GET
Request url:
https://auth-{us|eu}.beyondidentity.com/v1/tenants/{tenant_id}/realms/{realm_id}/applications/{application_id}/authorize?response_type=code&client_id={client_id}&redirect_uri={redirect_uri}&scope={scopes}&state={state}&code_challenge={codeChallenge}&code_challenge_method=S256where:
Property Value client_id {client_id} is your app's Client ID redirect_uri {redirect_uri} is one of the app's configured Redirect URI values scope {scopes} is 'openid' plus one or more of the app's Allowed Scopes, space delimited state {state} is a value generated by your app to maintain state betewen the request and response code_challenge {codeChallenge} is generated as defined in RFC 7636, example JavaScript snippet below: codeVerifier = crypto.randomBytes(32).toString('base64url');
codeChallenge = crypto
.createHash('sha256')
.update(codeVerifier)
.digest()
.toString('base64url');Consume the
/authorizeresponse and authorization codeIn response to the
/authorizerequest, Beyond Identity redirects to the app's configured authentication url. In this example, the authenticator configuration type is "Hosted Web", so the authentication url is hosted by Beyond Identity (see Authenticator Configurations).importantPlease note that the redirection must be handled in the front end (such as React, Angular, or vanilla JavaScript running in the user's browser) in order for passkey authentication to work.
Once passkey based authentication is complete, Beyond Identity will redirect back to the app's configued redirect URI with a 'code' parameter in the query string. You will use this code in the
/tokenrequest.Create your
/tokenrequestCreate the HTTP request with the following properties:
Request url:
https://auth-{us|eu}.beyondidentity.com/v1/tenants/{tenant_id}/realms/{realm_id}/applications/{application_id}/tokenThis endpoint can also be found in the Console, by navigating to your Application, then to the External Protocol tab, and scrolling down until you find the Token Endpoint.
Request method: POST
Request headers:
content-type: application/x-www-form-urlencodedRequest body:
grant_type: "authorization_code"
code: {authorization_code}
client_id: {client_id}
redirect_uri: {redirect_uri}
code_verifier: ${codeVerifier}
expiration_time: {seconds}
custom_claims: {custom_claims_json}
where:
Property Value code {authorization_code} is the code returned from the /authorizecallclient_id {client_id} is the app's configured Client ID redirect_uri {redirect_uri} is one of the app's configured Redirect URI values and matches the redirect_uri sent in the /authorizecallcode_verifier {codeVerifier} is defined as in RFC 7636, example JavaScript snippet below: codeVerifier = crypto.randomBytes(32).toString('base64url');
codeChallenge = crypto
.createHash('sha256')
.update(codeVerifier)
.digest()
.toString('base64url');expiration_time expiration_time is an OPTIONAL parameter, and {seconds} is the desired time after minting, in seconds, for which the token will be considered valid. If included, this value must be less than or equal to the app's configured Expires setting. custom_claims custom_claims is an OPTIONAL parameter, and {custom_claims_json} is a JSON string containing the desired additional claims as key value pairs, for example '{"a": "b", "c": "d"}'. Upon successful token request, the resulting token will contain additional field 'bi_custom' with the desired claims.
Authorization code with PKCE (Confidential client)
In this flow, you call the app's /authorize endpoint, initiating a browser based flow where the user provides their credentials in exchange for a code.
In a second API call to the /token endpoint, you then exchange the code for an access token.
You authenticate the call to the /token endpoint with the app's credentials.
Note that you will need an identity configured with the ability to authorize the scopes your app is requesting.
Create an app with the following properties:
Property Value Protocol OIDC Client Type Confidential PKCE S256 Token Endpoint Auth Method Client Secret Basic Grant Type Authorization Code Configuration Type (on Authenticator Config tab) Hosted Web Fill in a Display Name and at least one Redirect URI, then click Submit to save the app.
Create your
/authorizerequestCreate the HTTP request with the following properties:
Request method: GET
Request url:
https://auth-{us|eu}.beyondidentity.com/v1/tenants/{tenant_id}/realms/{realm_id}/applications/{application_id}/authorize?response_type=code&client_id={client_id}&redirect_uri={redirect_uri}&scope={scopes}&state={state}&code_challenge={codeChallenge}&code_challenge_method=S256where:
Property Value client_id {client_id} is your app's Client ID redirect_uri {redirect_uri} is one of the app's configured Redirect URI values scope {scopes} is 'openid' plus one or more of the app's Allowed Scopes, space delimited state {state} is a value generated by your app to maintain state betewen the request and response code_challenge {codeChallenge} is generated as defined in RFC 7636, example JavaScript snippet below: codeVerifier = crypto.randomBytes(32).toString('base64url');
codeChallenge = crypto
.createHash('sha256')
.update(codeVerifier)
.digest()
.toString('base64url');Consume the
/authorizeresponse and authorization codeIn response to the
/authorizerequest, Beyond Identity redirects to the app's configured authentication url. In this example, the authenticator configuration type is "Hosted Web", so the authentication url is hosted by Beyond Identity (see Authenticator Configurations).importantPlease note that the redirection must be handled in the front end (such as React, Angular, or vanilla JavaScript running in the user's browser) in order for passkey authentication to work.
Once passkey based authentication is complete, Beyond Identity will redirect back to the app's configued redirect URI with a 'code' parameter in the query string. You will use this code in the
/tokenrequest.Create your
/tokenrequestCreate the HTTP request with the following properties:
Request url:
https://auth-{us|eu}.beyondidentity.com/v1/tenants/{tenant_id}/realms/{realm_id}/applications/{application_id}/tokenThis endpoint can also be found in the Console, by navigating to your Application, then to the External Protocol tab, and scrolling down until you find the Token Endpoint.
Request method: POST
Request headers:
Authorization: Basic {client_credentials}
content-type: application/x-www-form-urlencoded
where {client_credentials} is the base64 encoded value of your app's Client ID and Client Secret, concatenated together in the format '{client_id}:{client_secret}'
Request body:
grant_type: "authorization_code"
code: {authorization_code}
client_id: {client_id}
redirect_uri: {redirect_uri}
code_verifier: ${codeVerifier}
expiration_time: {seconds}
custom_claims: {custom_claims_json}
where:
Property Value code {authorization_code} is the code returned from the /authorizecallclient_id {client_id} is the app's configured Client ID redirect_uri {redirect_uri} is one of the app's configured Redirect URI values and matches the redirect_uri sent in the /authorizecallcode_verifier {codeVerifier} is defined as in RFC 7636, example JavaScript snippet below: codeVerifier = crypto.randomBytes(32).toString('base64url');
codeChallenge = crypto
.createHash('sha256')
.update(codeVerifier)
.digest()
.toString('base64url');expiration_time expiration_time is an OPTIONAL parameter, and {seconds} is the desired time after minting, in seconds, for which the token will be considered valid. If included, this value must be less than or equal to the app's configured Expires setting custom_claims custom_claims is an OPTIONAL parameter, and {custom_claims_json} is a JSON string containing the desired additional claims as key value pairs, for example '{"a": "b", "c": "d"}'. Upon successful token request, the resulting token will contain additional field 'bi_custom' with the desired claims.
Token response
Client credentials response
The reponse to a /token request using the client credentials grant type for an OAuth app is a json object that contains an access_token:
{
  "access_token": "eyJ0eXAiOiJKV1QiLCJh ... VC-aYWQ62_A1WJj3fPZVEvXhClbZUhGbE3Eu78z",
  "token_type": "Bearer",
  "expires_in": 86400,
  "scope": "myapp:read"
}
Access token response
The reponse to a /token request using the authorization code grant type for an OIDC app is a json object that contains an access_token and an id_token:
{
  "access_token": "eyJ0eXAiOiJKV1QiLCJh ... WRDP_TWtJJe_qKiX6l4HiTFBv6jcPf2chkroDm",
  "token_type": "Bearer",
  "expires_in": 86400,
  "scope": "myapp:read",
  "id_token": "eyJhbGciOiJSUzI1NiIsImtpZ ... RedXTbWhBjxcYfh3MTWCnijaozSEud4S8WatKsvg"
}
Access token and refresh token response
The reponse to a /token request using the authorization code grant type for an OIDC app that has Enable Refresh Tokens checked is a json object that contains an access_token, refresh_token, and id_token:
{
  "access_token": "eyJ0eXAiOiJKV1QiLCJh ... 0NJrpbRJjyafVvV3iFgwgf51y9HO",
  "token_type": "Bearer",
  "expires_in": 86400,
  "refresh_token": "eyJ0eXAiOiJKV1QiLCJh ... _ATJOHUEeKuScnIWnHtNdmxwIT2H",
  "scope": "myapp:read",
  "id_token": "eyJhbGciOiJSUzI1Ni ... rApNYtgqpWY7ripecTXqoHXHna8kq2M7W"
}
Example: Create a Token for the Beyond Identity Management API
To request tokens for the Beyond Identity Management API programmatically, we recommend that you create an app that references the 'Beyond Identity Management API' Resource Server, then send a request to the app's /authorize and/or /token API endpoints following the OAuth and OIDC protocols.
Follow the steps below based on the flow you wish to use, either client credentials or authorization code:
- Client Credentials
- Authorization Code
Create an app with the following properties:
Property Value Protocol OAuth2 Client Type Confidential PKCE Disabled Token Endpoint Auth Method Client Secret Basic Grant Type Client Credentials Resource Server Beyond Identity Management API Allowed Scopes add the scopes required for the API call based on the Beyond Identity Management API documentation Fill in a Display Name, then click Submit to save the app.
Next, create the
/tokenrequest as shown below:- Curl
- CSharp
- Dart
- Go
- Java
- Node
- Python
- Ruby
- Rust
/token1 2 3 4 5curl "https://auth-$(us|eu).beyondidentity.com/v1/tenants/$(tenant_id)/realms/$(realm_id)/applications/$(application_id)/token" \ -X POST \ -u "$(client_id):$(client_secret)" --basic \ -H "Content-Type: application/x-www-form-urlencoded" \ -d "grant_type=client_credentials&scope=$(scope)"/token/token/token/token/token/token/token/tokenwhere:
application_id is the Application ID of the app you created
client_id and client_secret are the Client ID and Client Secret, respectively, of the app you created
scopes is one or more of the app's Allowed Scopes, space delimited, and includes the required scopes for the API call(s) your app will make
Create an app with the following properties:
Property Value Protocol OIDC Client Type Confidential PKCE S256 Token Endpoint Auth Method Client Secret Basic Grant Type Authorization Code Resource Server Beyond Identity Management API Allowed Scopes add the scopes required for the API call based on the Beyond Identity Management API documentation Configuration Type (on Authenticator Config tab) Hosted Web Fill in a Display Name and at least one Redirect URI, then click Submit to save the app.
Next, use the following examples to obtain an authorization code and then to create a token with that code:
Create the
/authorizecall to obtain an authorization code:- Curl
- CSharp
- Dart
- Go
- Java
- Node
- Python
- Ruby
- Rust
/authorize1 2 3 4 5 6 7 8curl -G "https://auth-{us|eu}.beyondidentity.com/v1/tenants/{tenant_id}/realms/{realm_id}/applications/{application_id}/authorize" \ --data-urlencode "response_type=code" \ --data-urlencode "client_id=$(client_id)" \ --data-urlencode "redirect_uri=$(redirect_uri)" \ --data-urlencode "scope=$(scopes)" \ --data-urlencode "state=$(state)" \ --data-urlencode "code_challenge=$(codeChallenge)" \ --data-urlencode "code_challenge_method=S256"/authorize/authorize/authorize/authorize/authorize/authorize/authorize/authorizewhere:
application_id is the Application ID of the app you created
client_id is your app's Client ID
redirect_uri is one of the app's configured Redirect URI values
scopes is 'openid' plus one or more of the app's Allowed Scopes, space delimited
state is a value generated by your app to maintain state betewen the request and response
codeChallenge is generated as defined in RFC 7636, example JavaScript snippet below:
codeVerifier = crypto.randomBytes(32).toString("base64url");
codeChallenge = crypto
  .createHash("sha256")
  .update(codeVerifier)
  .digest()
  .toString("base64url");
Then create the
/tokencall to create an access token:- Curl
- CSharp
- Dart
- Go
- Java
- Node
- Python
- Ruby
- Rust
/token1curl "https://auth-{us|eu}.beyondidentity.com/v1/tenants/{tenant_id}/realms/{realm_id}/applications/{application_id}/token" \ -X POST \ -u "$(client_id):$(client_secret)" --basic \ -H "Content-Type: application/x-www-form-urlencoded" \ -d "grant_type=authorization_code&code=$(authorization_code)&redirect_uri=${redirect_uri}&client_id=$(client_id)&code_verifier=$(CODE_VERIFIER)"/token/token/token/token/token/token/token/tokenwhere:
application_id is the Application ID of the app you created
client_id and client_secret are the Client ID and Client Secret, respectively, of the app you created
redirect_uri is one of the app's configured Redirect URI values and matches the redirect_uri sent in the
/authorizecallauthorization_code is the code returned from the
/authorizecallcodeVerifier is defined as in RFC 7636, example JavaScript snippet below:
codeVerifier = crypto.randomBytes(32).toString("base64url");
codeChallenge = crypto
  .createHash("sha256")
  .update(codeVerifier)
  .digest()
  .toString("base64url");
Example: Create a Token with a Limited Expiration Time
This parameter is used to set a custom expiration time on individual tokens, to a value that is less than what was originally configured. This is done by passing an expiration_time parameter to the /token endpoint.
- Client Credentials
- Authorization Code
- Curl
- CSharp
- Dart
- Go
- Java
- Node
- Python
- Ruby
- Rust
/token1curl "https://auth-$(REGION).beyondidentity.com/v1/tenants/$(TENANT_ID)/realms/$(REALM_ID)/applications/$(APPLICATION_ID)/token" \ -X POST \ -u "$(CLIENT_ID):$(CLIENT_SECRET)" --basic \ -H "Content-Type: application/x-www-form-urlencoded" \ -d "grant_type=client_credentials&scope=$(SCOPES)&expiration_time=3600"
/token/token/token/token/token/token/token/tokenwhere:
- CLIENT_ID and CLIENT_SECRET are the **Client ID** and **Client Secret**, respectively, of the app

- SCOPES is one or more of the app's **Allowed Scopes**, space delimited

- the value of expiration_time parameter is the desired lifetime, in seconds, of the requested token, for example 3600 would indicate 1 hour
- Curl
- CSharp
- Dart
- Go
- Java
- Node
- Python
- Ruby
- Rust
/authorize1curl -G "https://auth-$(REGION).beyondidentity.com/v1/tenants/$(TENANT_ID)/realms/$(REALM_ID)/applications/$(APPLICATION_ID)/authorize" \ --data-urlencode "response_type=code" \ --data-urlencode "client_id=$(APPLICATION_CLIENT_ID)" \ --data-urlencode "redirect_uri=$(REDIRECT_URI)" \ --data-urlencode "scope={SCOPES}" \ //for example scope=openid%20myapp%3Aread%20myapp%3Awrite --data-urlencode "state=$(STATE)" \ --data-urlencode "code_challenge=$(CODE_CHALLENGE)" \ --data-urlencode "code_challenge_method=S256"
/authorize/authorize/authorize/authorize/authorize/authorize/authorize/authorizewhere:
- APPLICATION_CLIENT_ID is your app's **Client ID**

- REDIRECT_URI is one of the app's configured **Redirect URI** values

- SCOPES is 'openid' plus one or more of the app's **Allowed Scopes**, space delimited

- STATE is a value generated by your app to maintain state betewen the request and response

- CODE_CHALLENGE is generated as defined in [RFC 7636](https://datatracker.ietf.org/doc/html/rfc7636#section-4.2), example JavaScript snippet below:<br/><br/><CodeChallengeVerifier/>
- Curl
- CSharp
- Dart
- Go
- Java
- Node
- Python
- Ruby
- Rust
/token1curl "https://auth-$(REGION).beyondidentity.com/v1/tenants/$(TENANT_ID)/realms/$(REALM_ID)/applications/$(APPLICATION_ID)/token" \ -X POST \ -u "$(CLIENT_ID):$(CLIENT_SECRET)" --basic \ -H "Content-Type: application/x-www-form-urlencoded" \ -d "grant_type=authorization_code&code=$(CODE)&redirect_uri=${REDIRECT_URI}&client_id=$(CLIENT_ID)&code_verifier=$(CODE_VERIFIER)&expiration_time=3600"
/token/token/token/token/token/token/token/tokenwhere:
- CLIENT_ID and CLIENT_SECRET are the **Client ID** and **Client Secret**, respectively, of the app

- CODE is the code returned from the `/authorize` call

- REDIRECT_URI is one of the app's configured **Redirect URI** values and matches the redirect_uri sent in the `/authorize` call

- CLIENT_ID is the app's configured **Client ID**

- CODE_VERIFIER is defined as in [RFC 7636](https://datatracker.ietf.org/doc/html/rfc7636#section-4.1), example JavaScript snippet below:<br/><br/><CodeChallengeVerifier/>

- the value of expiration_time parameter is the desired lifetime, in seconds, of the requested token, for example 3600 would indicate 1 hour
When calling inspect on the newly created token you will see the following fields. You can now verify that the difference between expiration time ('exp') and issued at time ('iat') is equal to the value sent as the expiration_time request parameter, in this example 3600 seconds.
{
  "active": true,
  "bi_ty": "authorization_code",
  "iss": "https://auth-us.beyondidentity.com/v1/tenants/00018c7edb8e1e3c/realms/1fa458f68ece5b5d/applications/235231f7-bd5d-404a-bb58-c6370b544c54",
  "sub": "7a8cce58fd160449",
  "aud": [
    "RY-N2xUjQb5PqKl9HwBLgpnV",
    "http://myexampleapi"
  ],
  "exp": 1689041630,
  "nbf": 1689038030,
  "iat": 1689038030,
  "jti": "7USu6gCUKhmQuvMmrhwam7QnYiGyl4aq",
  "scope": "myapp:write myapp:read",
  "azp": "tenants/00018c7edb8e1e3c/realms/1fa458f68ece5b5d/applications/235231f7-bd5d-404a-bb58-c6370b544c54",
  "bi_p": "tenants/00018c7edb8e1e3c/realms/1fa458f68ece5b5d/identities/7a8cce58fd160449",
  "bi_s": "",
  "bi_x": "n3eBAmnWIDw3amXoCgaSn-b2Yo3_JtWe"
}
Example: Create a Token with Custom Claims
The custom_claims parameter allows for additional information to be stored within a token. The provided data must be a valid JSON object. Upon a successful token request, the data will be available within the bi_custom field of the response JWT payload.
- Client Credentials
- Authorization Code
- Curl
- CSharp
- Dart
- Go
- Java
- Node
- Python
- Ruby
- Rust
/token1curl "https://auth-$(REGION).beyondidentity.com/v1/tenants/$(TENANT_ID)/realms/$(REALM_ID)/applications/$(APPLICATION_ID)/token" \ -X POST \ -u "$(CLIENT_ID):$(CLIENT_SECRET)" --basic \ -H "Content-Type: application/x-www-form-urlencoded" \ -d "grant_type=client_credentials&scope=$(SCOPES)&custom_claims={"a": "b", "c": "d"}"
/token/token/token/token/token/token/token/tokenwhere:
- CLIENT_ID and CLIENT_SECRET are the **Client ID** and **Client Secret**, respectively, of the app

- SCOPES is one or more of the app's **Allowed Scopes**, space delimited

- the value of the custom_claims parameter is a JSON string containing the key/value pairs you wish the token to include
- Curl
- CSharp
- Dart
- Go
- Java
- Node
- Python
- Ruby
- Rust
/authorize1curl -G "https://auth-$(REGION).beyondidentity.com/v1/tenants/$(TENANT_ID)/realms/$(REALM_ID)/applications/$(APPLICATION_ID)/authorize" \ --data-urlencode "response_type=code" \ --data-urlencode "client_id=$(APPLICATION_CLIENT_ID)" \ --data-urlencode "redirect_uri=$(REDIRECT_URI)" \ --data-urlencode "scope={SCOPES}" \ //for example scope=openid%20myapp%3Aread%20myapp%3Awrite --data-urlencode "state=$(STATE)" \ --data-urlencode "code_challenge=$(CODE_CHALLENGE)" \ --data-urlencode "code_challenge_method=S256"
/authorize/authorize/authorize/authorize/authorize/authorize/authorize/authorizewhere:
- APPLICATION_CLIENT_ID is your app's **Client ID**

- REDIRECT_URI is one of the app's configured **Redirect URI** values

- SCOPES is 'openid' plus one or more of the app's **Allowed Scopes**, space delimited

- STATE is a value generated by your app to maintain state betewen the request and response

- CODE_CHALLENGE is generated as defined in [RFC 7636](https://datatracker.ietf.org/doc/html/rfc7636#section-4.2), example JavaScript snippet below:<br/><br/><CodeChallengeVerifier/>
- Curl
- CSharp
- Dart
- Go
- Java
- Node
- Python
- Ruby
- Rust
/token1curl "https://auth-$(REGION).beyondidentity.com/v1/tenants/$(TENANT_ID)/realms/$(REALM_ID)/applications/$(APPLICATION_ID)/token" \ -X POST \ -u "$(CLIENT_ID):$(CLIENT_SECRET)" --basic \ -H "Content-Type: application/x-www-form-urlencoded" \ -d "grant_type=authorization_code&code=$(CODE)&redirect_uri=${REDIRECT_URI}&client_id=$(APP_CLIENT_ID)&code_verifier=$(CODE_VERIFIER)&expiration_time=3600&custom_claims={"a": "b", "c": "d"}"
/token/token/token/token/token/token/token/tokenwhere:
- CLIENT_ID and CLIENT_SECRET are the **Client ID** and **Client Secret**, respectively, of the app

- CODE is the code returned from the `/authorize` call

- REDIRECT_URI is one of the app's configured **Redirect URI** values and matches the redirect_uri sent in the `/authorize` call

- CLIENT_ID is the app's configured **Client ID**

- CODE_VERIFIER is defined as in [RFC 7636](https://datatracker.ietf.org/doc/html/rfc7636#section-4.1), example JavaScript snippet below:<br/><br/><CodeChallengeVerifier/>

- the value of the custom_claims parameter is a JSON string containing the key/value pairs you wish the token to include
After a token is created, when introspected, the token will contain the bi_custom field with all of the claims. In this case, we sent {"a": "b", "c": "d"} as the custom_claims parameter.
{
  "active": true,
  "bi_ty": "authorization_code",
  "iss": "https://auth-us.beyondidentity.com/v1/tenants/00018c7edb8e1e3c/realms/1fa458f68ece5b5d/applications/c08e8bd9-d41d-4fc8-aa8e-309fe8843d5d",
  "sub": "7a8cce58fd160449",
  "aud": [
    "btSEEvQcWay6F_lGI6lI-V8z",
    "http://myexampleapi"
  ],
  "exp": 1689126046,
  "nbf": 1689039646,
  "iat": 1689039646,
  "jti": "xJE5aS6_nZgmmWaY9fMnFD6F3YxiwjmL",
  "scope": "myapp:read myapp:write",
  "azp": "tenants/00018c7edb8e1e3c/realms/1fa458f68ece5b5d/applications/c08e8bd9-d41d-4fc8-aa8e-309fe8843d5d",
  "bi_p": "tenants/00018c7edb8e1e3c/realms/1fa458f68ece5b5d/identities/7a8cce58fd160449",
  "bi_custom": {
    "a": "b",
    "c": "d"
  },
  "bi_s": "",
  "bi_x": "UdTa2Lh1_bRKr3mdOTt3yE1dHE1UlUlH"
}